Tutorial Thursday {Copic Coloring - Dark Skin Tones}


 We saw this tutorial from Kathy of Inspired to Stamp awhile back and asked Kathy's permission to share it with all of you.  Thank you SO MUCH Kathy for allowing us to share this with our fans!!

Today I'm using one of the new La La Land Crafts stamps called Marci with Flower, she's cute isn't she!!  :)
Begin by colouring your base layer with E11.  It's OK if it's not totally smooth, there will be plenty blending.
I've assumed the light source is coming from the top right, so I've added E13 a little heavier on the left side.  (I'm showing the colour before blending - once you've added your E13, blend with E11 to smooth it.)
Next, take E15 to deepen the shadows, don't add too much and then blend with E13 and E11.
Next use your E18 to really deepen those shadows and use the lighter colours above to blend.  You don't need a lot of E18, but remember the more contrast, the more interesting your picture will look!  Once again, blend with your lighter colours, E15, E13 and E11.

 To cool those deepest shadows down and make them a little deeper, use BV00 (or if you want a lot of contrast, try BV13!).

Finish colouring your image in your favourite colours!!
Copic Colours Used
Skin - E11, E13, E15, E18, BV00
Mouth - E04
Hair - C0, C1, C3, C5, C7
Shirt/Shoes - Y21, Y35, Y38, YR24
Jeans - B91, B93, B95, B97
Flowerpot - E97, E08, E19
Flower - R81, R83, E51, E53, G24, G28, E35, E37
Spade - C0, C1, C3
We hope this tutorial was helpful to you.  We would love to see what you can do too.  Please don't forget to share your creations with us in our Customer Gallery and also on our Facebook Page!!  :-)

Tutorial Thursday {Cutting Out Images}


DSC05659vv


Hi everyone!! lots of people have asked me how I cutout tight spots in my images so I thought I’d give you a few tips. First up you need a image you colored, I have SWEET Buccaneer Marci all colored and trimmed around. Next you will want a pair of small SHARP Scissors. I always need my reading glasses, for the fine details.


Then I start trimming around my image about an 1/8 of an inch. Just follow your image all the way around.


Ok now this is where I cheat a bit, I cut between her boots cutting on the solid line between them. Many people like to use a craft knife for this, so that there isn’t a cut on her boots. I haven’t mastered the art of cutting with a knife and end up wrecking my image.


Here she is all cut out, you can see where I sliced between her boots. You can leave her like that or I sometimes but a little piece of tape on the back, so you don’t notice the seam. See my finished project below, you don’t even notice the seam.


Skin: E00, E11, R20


Hair: Y23, E31


Grey: T2, T5, T7


Outfit: RV66, RV63, RV69


Orange: YR07, YR04


I used this technique on Cowgirl Marci's rope! You can see my Cowgirl Marci post HERE!!


Hugs Cindy XXOO

Coloring Marci Ballerina - Video Tutorials by Suzanne Dean!!

We had the honor of meeting Suzanne Dean at CHA when she stopped by our booth!!  Suzanne even sat down to do one of our make-and-take projects.  And I am now the proud owner of Suzanne's original colored Chef Marci!! 

Now.. check this out!!  Suzanne used OUR Ballerina Marci in her NEW series of Copic Tutorilas!!!  How AWESOME!!!!  Suzanne even gave us permission to share her video tutorials on our blog..  Here they are, ENJOY!!


We were told that there is a card coming up with this colored image in a few days too!!!  Can't wait to see and I already know that I will love it!!  Thank you SO MUCH Suzanne!!!

Hugs!!


Ballerina Jewelry Box Tutorial by Nicole Zarra

Good Sunday morning to you!!  Drawer Boxes are very popular projects right now and you've seen a few on our blog here before as well.  We've gotten a lot of requests for a Tutorial on how to make it and it has been on our To-Do List for a long time now!!  When Irina saw one of the entries in our Customer Gallery, she just had to invite the designer to share her tutorial with all of you!!  Without further ado..

Meet our Guest Designer-for-the-day... Nicole Zarra!

Hi! I'm Nicole, I'm a 25 year old, stay at home mother of 2 and engaged to a wonderful man who supports me on all my paper crafting addictions lol. I got my first scrapbooking set when I was 14 and I was hooked ever since. I love teaching and inspiring others to make beautiful creations. Im my spare time, when im not being a full time mommy and house wife, I teach paper crafting projects at my local scrapbooking store and spend as much time in my crafting room as possible. I hope I can inspire you to make wonderful creations of your own.

Ballerina Marci Drawer Box Tutorial
by Nicole Zarra


You need 2 pieces of chip board 6x6 inches.

You need 4 pieces of cardstock 6x6 inches

You are going to paste the cardstock on both sides of the chip boards above.

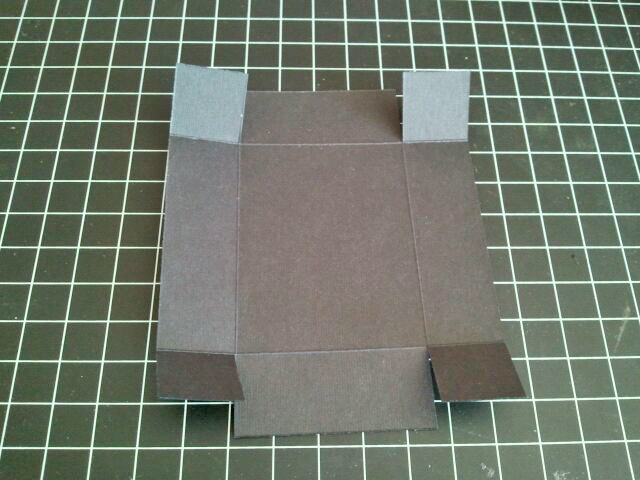
Now we're going to make the drawers.
Cut cardstock at 4 15/16 (length) x 4 1/8 (width) inches, cut 4 of these.
Score at  4 (length) and  3 3/16 (width).

Cut as shown above.

Glue as shown above.

Fold the 4 corners, and your first drawer is almost done.

Add a mat to the front of your drawer, 2 (length) and 3/4 (width) inches.
I've mounted Tim Holtz Hitch Fasteners on each drawer.

Now on to the outside of the drawer.
This panel is 7 5/8 x 3 1/8 inches
Scor at 1 inch, 3 5/16 inch,  4 5/16 inch and 6 5/8 inch
You will need 4 of these.

Fold and glue as shown above.

This is what it should look like.

We will now glue the drawers on the bottom of the box.


Add glue to the top of the drawers.

Then add the top of your box.

Add an easel card to the top of your box, and you are done:)

FANTABULOUS Nicole... thank you for sharing your awesome tutorial with us today!  I hope this inspired all of you and if you make one, please come share it with us in our customer gallery!  We'd love to see yours =)

Pop Up Stage Card Tutorial

This collapsible Pop-Up Stage card is sure to delight your special someone this Halloween... and I'm going to show you how I did it!!


Supplies:
Card base- 5.5" x 11" and folded in half at 5.5"
Black cardstock for stage - 5.5" x 6.25"
Black cardstock for tabs - 2" x 1/2"
Clear heavy acetate (or clear cardstock) - 2" x 1/2" (*Optional)
Green cardstock for belly band - 12" x 1 3/4"
BG Eerie Papers - 5 3/8" square (for inside top); 5 3/8" x 5.25" (to cover top of stage); and 3/4" x 5 3/8" (front bottom piece)
Halloween images - Pumpkin Marci & Witch Marci
Cherry Blossoms Die - Sizzix
Fence Border Punch - Martha Stewart
Exacto knife
Double-sided tape
Crimper (*Optional for bellyband)

*NOTE: Before you begin, if you wish to add a piece of designer paper to the outside card front, now is a good time to do it as it may be harder once your inside gets thicker! ☺

Let's Begin!

1. Tape your 5 3/8" square piece of designer paper to the inside top of card.
2. Score your longest side of stage (6.25" side) at 1/2" on one end and then I flipped it over and scored 1/2" and 1" on the opposite end.
3. Score your stage designer piece at 1/2" on the short side and tape it to your stage, making sure you align the 1/2" score with the end 1" score end of stage.

4. Arrange your images on the stage, making sure that when laying flat that they don't stick outside of the top of stage (not counting the outer scored edges). Draw 1/2" lines at the bottom of images.
(You see one of my images is upside down. That's because that image will fold forward and the witch will fold backward when the card is closed.)

5. Use exacto knife to cut slits that are 1/2" long where you want the images to stand.

6. Score your 2" x 1/2" tabs at 1/2" on one end. You may use all colored cardstock for your tabs, however, I didn't want some of my tabs showing on some of my skinnier images so I used clear acetate for some.

**Important: For the ones in front that will fold backwards, you want to apply tape to the top side of the 1/2" scored end and insert tabs in the front slits so that they are taped to the underside of stage.

7. Apply tape to each 1/2" outer scored end of your stage then tape the single scored edge to the card top, just above where your card base is scored. Then while holding your card top at a 90 degree angle, tape the other end (outer 1/2") under. You may now apply the front images (or wait til the end).

8. Now you want to apply tape to the under side of the 1/2" scored tabs and carefully slide them into the slots and tape them down to the card base like this:

9. Apply the rest of your images to the front of your tabs.
10. Apply designer paper to the front card base and a sentiment if you wish and Ta-Da!


HOW IT FOLDS CLOSED & FINISHING THE OUTSIDE:

11. As you fold it closed, the back pieces will automatically be pushed forward. You might have to "help" the front pieces fold towards the back though (witch Marci & front fence, and the li'l black tree.)

12. You need your 12" x 1 3/4" strip (crimped or non) and any image you wish to add on top of band (*Optional)
13. Loosely wrap band around closed card. If you wrap too tightly, it will be very hard to slip it on and off. 14. Tape band ends together on back side of card.
15.  Tape medallion (or other image) to the band
Voila!!
Sentiment: "What's Poppin' Up is yet to be seen..."
Inside: "Have a SPOOKtacular Halloween!"

Happy Creating!!!  =)