Tutorial Thursdsay {LLLC Dies - Cuttlebug Tutorial}


Yesterday we announced an NEW addition to our range of products - STEEL DIES!! Today we would like to share a Product Introduction video that included a Cuttlebug TUTORIAL!

If you already purchased our dies or have them on your Wish List, please make sure to watch this video to learn how to use our dies properly :-)

Enjoy!


Hugs!!

Tutorial Thursday {Dots}

Hi there Crafty Peoples, it is Sue here with another Tutorial Thursday!
I hope you are gearing up for a wonderful Easter Break, with a feast of fabulous 'Guilt' free chocolates!

Our tutorial today is featuring 'Dots' (my all time favourite!) made with Copic markers.  It is so easy and it gives an amazing effect, whether it be clothes, shoes, backgrounds and the list could go on....

Marci with Bunny looks so sweet all dotted up!

Using the SSSC #154  sketch

Sit back and enjoy!


If you are having trouble viewing the video, here is the direct link

If you would like to see all the copics colours used in this card head over here...

Happy Easter to you all

Sue :)

Tutorial Thursday {Copic Coloring - Dark Skin Tones}


 We saw this tutorial from Kathy of Inspired to Stamp awhile back and asked Kathy's permission to share it with all of you.  Thank you SO MUCH Kathy for allowing us to share this with our fans!!

Today I'm using one of the new La La Land Crafts stamps called Marci with Flower, she's cute isn't she!!  :)
Begin by colouring your base layer with E11.  It's OK if it's not totally smooth, there will be plenty blending.
I've assumed the light source is coming from the top right, so I've added E13 a little heavier on the left side.  (I'm showing the colour before blending - once you've added your E13, blend with E11 to smooth it.)
Next, take E15 to deepen the shadows, don't add too much and then blend with E13 and E11.
Next use your E18 to really deepen those shadows and use the lighter colours above to blend.  You don't need a lot of E18, but remember the more contrast, the more interesting your picture will look!  Once again, blend with your lighter colours, E15, E13 and E11.

 To cool those deepest shadows down and make them a little deeper, use BV00 (or if you want a lot of contrast, try BV13!).

Finish colouring your image in your favourite colours!!
Copic Colours Used
Skin - E11, E13, E15, E18, BV00
Mouth - E04
Hair - C0, C1, C3, C5, C7
Shirt/Shoes - Y21, Y35, Y38, YR24
Jeans - B91, B93, B95, B97
Flowerpot - E97, E08, E19
Flower - R81, R83, E51, E53, G24, G28, E35, E37
Spade - C0, C1, C3
We hope this tutorial was helpful to you.  We would love to see what you can do too.  Please don't forget to share your creations with us in our Customer Gallery and also on our Facebook Page!!  :-)

Tutorial Thursday - Square Christmas Cracker

Good morning. Today we have a tutorial by our Guest Designer Jo Nevill. Jo made a wonderful Square Christmas Cracker for her GDT project last week and very kindly prepared a tutorial to show how it's done. 

Supplies-
12” x 11” patterned cardstock for cracker
2 x end stiffeners  - 2” x 11”
1 x centre stiffener – 3½” x 11”
Nestabilities square (measuring 1 1/8”) or square piece of card measuring 7/8th” x 7/8th”

How To - 
Score the patterned cardstock and all the stiffeners along the 11” edge at 2.5”, 5”, 7.5” and 10”

Attach the two end stiffeners to the ends of the cardstock and the centre stiffener to the centre of the cracker.

Using the centre square of the Nestabilities square die or your template square, draw **diamonds across the score lines making sure the centre of the diamond runs through the score line.  Also make sure the points of the diamonds are also lined up.  When you get to the end of the cardstock, draw a triangle shape as shown.  Repeat this both ends of the cracker.

Score three lines, one line above the top of the diamond shapes, one through the centre of the diamonds and one below the diamond shapes.

Fold all the score lines and at the ends make two mountain folds and a valley fold.

 Assemble the cracker and fold the ends.

Embellish as desired, and add your favourite La-La Land Crafts image. Add ribbon on both ends and your cracker is complete


**You can make the diamond shapes larger so that the ends of the cracker “pinch” more and can be used as a proper cracker when a snap is added to the centre.  If adding a snap, attach the snap with a small amount of glue or tape to the centre and each end of the snap otherwise it will not snap when pulled!.

 Thanks so much for stopping by today. We do hope you will try your hand at one of Jo's Crackers - and don't forget to link up in the customer gallery if you do.
xx

Tutorial Thursday {Making Alcohol Blender Ink Backgrounds}


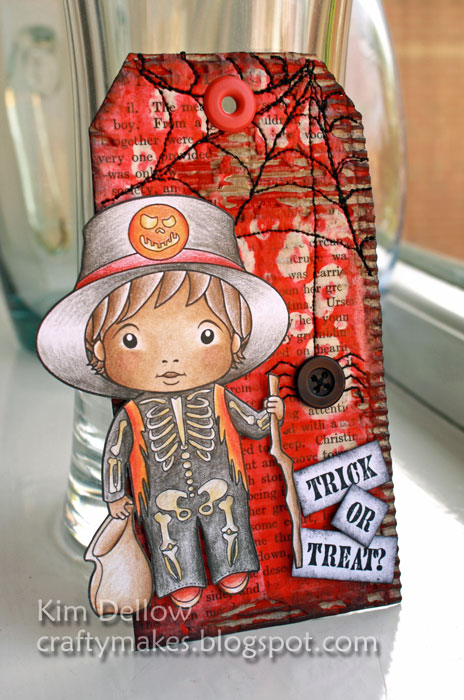
Hey guys, Kim Dellow here. I thought I would share with you how I made the background to the red Skeleton Luka tag I made for this week's Inspiration Monday. 

It uses a technique that I've adapted from Nancy Reyner's book Acrylic Revolution and is really easy to do if you have a little bit of time and want to play with some acrylic paint and alcohol blender ink. I just love the texture it adds to a make!


You will need:
Corrugated Card
Old Book Page
A Liquid Glue (like PVA or Elmer's)
Acrylic Paint
Alcohol Blending Ink (like ZIG Kurecolor Blender refill/alcohol ink; Adirondack Alcohol Blending solution or Rubbing Alcohol solution)
Golden Polymer Medium (Gloss)
Non-Absorbent surface (like an Acrylic block)
Non-Absorbent dip stick (like a palette knife)

Plus - Your favourite La-La Land Crafts Halloween Image (mine was Skeleton Luka), colouring materials, button, needle, sewing machine, thread, eyelet and eyelet puncher, button, black ink pad, Alpha stamps.


Step One - Prepare The Background
Cut a piece of corrugated card to bigger than you want your final tag to be and if you need to, take the top layer of paper off to expose the corrugations.

Tear out a page from an old (unwanted!) book and use the glue to stick the page to the corrugated card and let it dry fully.

Once dry tear off the book page to reveal the corrugated card again, you can leave on or take off as much as you want!


Step Two - Seal The Surface
You need to coat the support with a layer of medium to seal it, so try a gloss medium like the Golden Polymer Medium. Before you coat the book page/corrugated card it is quite absorbent and will just soak up the acrylic paint and alcohol blender solution and you wont get the
same effect.

Allow this layer to dry before moving on to the next step.


Step Three - Paint The Tag
Cut out the tag shape from the prepared corrugated card. Make up an acrylic paint solution with your chosen colour and some water, I used approximately 1:1 water to paint for my glaze but it really is down to personal preference and the acrylic paint you are using.

Now you will have to start working a bit quickly at this point as you do not want the paint to dry before you add the alcohol blender ink.

Paint the tag and move directly onto the next step.


Step Four - Add The Blender And Watch The Magic!
Add a couple of drops of the alcohol blender ink to a non-porous surface (I used an acrylic block) and dip your non-porous dip stick (e.g. a palette knife) into the drops and then touch it to the still wet acrylic paint on the tag.

The alcohol blender ink spreads in a circle pushing the acrylic paint away from the area leaving a really interesting look. The more alcohol blender ink you add the bigger the circle will be so try adding different amounts to get different looks but be careful not to use too much as it will wash the paint away completely.

Repeat this process as many times as you want to get the look you want. When you have finished let the tag dry.


Step Five - Add A Bit Of Stitchery
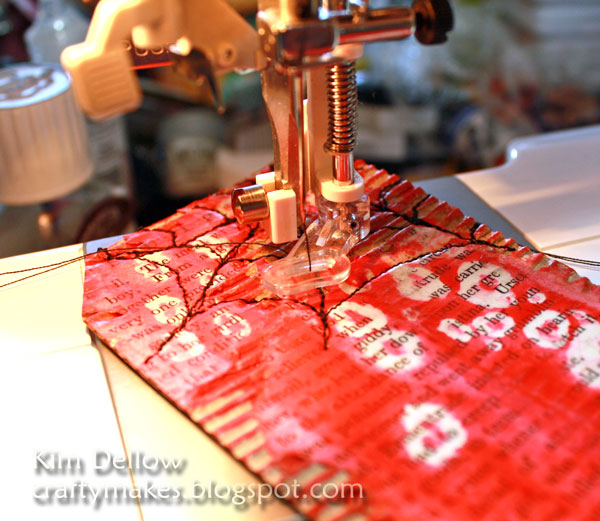
Free-stitch, machine stitch or hand stitch (whichever you are most comfortable with) a spider's web at the top of your tag.


Step Six - And Finish!
Sew on a little spider button and stitch it some legs - creepy! Edge the tag with the black ink pad and add the eyelet. Colour your La-La Land Crafts image and stick to the tag. Finish with the little sentiment. 

Have fun with this one!

Thanks for popping by.


Tutorial Thursday {Cutting Out Images}


DSC05659vv


Hi everyone!! lots of people have asked me how I cutout tight spots in my images so I thought I’d give you a few tips. First up you need a image you colored, I have SWEET Buccaneer Marci all colored and trimmed around. Next you will want a pair of small SHARP Scissors. I always need my reading glasses, for the fine details.


Then I start trimming around my image about an 1/8 of an inch. Just follow your image all the way around.


Ok now this is where I cheat a bit, I cut between her boots cutting on the solid line between them. Many people like to use a craft knife for this, so that there isn’t a cut on her boots. I haven’t mastered the art of cutting with a knife and end up wrecking my image.


Here she is all cut out, you can see where I sliced between her boots. You can leave her like that or I sometimes but a little piece of tape on the back, so you don’t notice the seam. See my finished project below, you don’t even notice the seam.


Skin: E00, E11, R20


Hair: Y23, E31


Grey: T2, T5, T7


Outfit: RV66, RV63, RV69


Orange: YR07, YR04


I used this technique on Cowgirl Marci's rope! You can see my Cowgirl Marci post HERE!!


Hugs Cindy XXOO

Tutorial Thursday {Copic Coloring - Marci with Rose}

Did you enjoy our NEW Sports Collection Release Blog Hop yesterday with the most awesome samples from our amazing Design Team?  If by some chance you'd missed it, just scroll down to the post below or just click HERE.


Hello and Welcome to our Tutorial Thursday!! 

Irina is here today to share another Copic Coloring Video Tutorial!!  

In this Tutorial I will show you how I colored our Marci with Rose for the card below. 


I made this tutorial awhile back and my coloring style has since changed a bit, but it is still a good fundamental tutorial and I hope it helps some of you to learn how to color our images.  This is a two-part tutorial and I am sharing both parts of it with you today.

Part 1 - Skin, Hair, Dress


Part 2 - Hat, Shoes, Rose, Grass


  Marci with Rose was stamped with Memento ink in Tuxedo Black on Neenah Crest Solar White cardstock.  

Colored with Copic Markers:
Skin - E000, E00, E01
Hair - E50, YR20, E33, E35
Dress - BV0000, BV000, BV01
Hat, Shoes, Rose - Y21, Y23, Y26, Y28
Hat Band - E40
Rose Stem, Leaves - YG91, YG93

Our Marci with Rose available both as a Rubber Stamp and as a Digi.  Click HERE to visit our store.

Come back tomorrow for more inspiration from our Design Team!! 

Hugs!!
:) Irina

Tutorial Thursday {Copic Coloring Skin Tone and Hair}


Happy Thursday and welcome to the first post in our Tutorial Thursdays series! Every Thursday we will share a different tutorial with you!!  We will have tutorials on coloring with different mediums and tutorials on various projects!!

Hello, this is Jeanette, one of the new members of the La-La Land Crafts Design Team and I have created a Copic coloring video for you.  This is actually the first part of a 2-part video and it focuses on coloring skin tone and hair. 

Hope you enjoy!


Copic Sketch Markers Used:
  • Skin: E000 , E00, E11, R20
  • Lips: R20, R22
  • Hair: E50, YR30, E31
Stamped on Neenah Solar Crest White Cardstock with Memento Tuxedo Black Ink.


 I will share the second part of this video tutorial next week, stay tuned!

Have a great day!

Hugs
Jeanette xxo